Git Clone Your OpenShift Ghost Blog
Feb 25, 2015 · 3 min read
So I decided to compile a mini tutorial comprising of five parts, which go through the steps involved in starting up a Ghost blog on OpenShift using my experiences. The topics covered so far are:
- Starting a New Blog With Ghost and Openshift
- Git Clone Your OpenShift Ghost Blog (This Post)
- Update Your Ghost Blog
- Use a Custom Domain for Your Ghost Blog
- Free SSL For Your Ghost Blog (Coming soon)
Outcome of This Tutorial Clone a local copy of your Ghost blog.
Prerequisites
- Have an OpenShift account
- Have already deployed an Ghost application
- Have already setup rhc
All of these are covered by the first post in this blog series, Starting a New Blog With Ghost and Openshift.
What is Git It is a very popular and efficient open source Version Control
System.
Install The latest version of git can be downloaded from
here. It is a simple installer that does not take long to install.
Clone Now that you have installed git you have to clone your repository from
on OpenShift, this will allow you to make local changes so that you can then push back to your Ghost application.
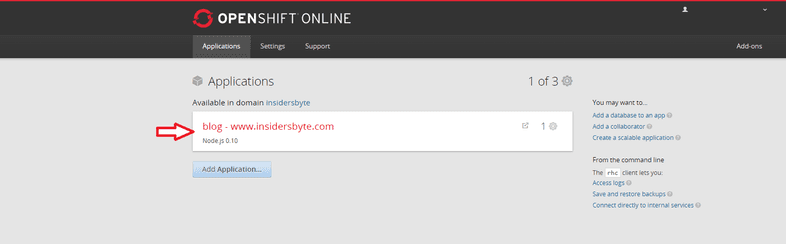
Before you can clone your blog you need to know the repository url, this is an easy process. Firstly you need to sign into your OpenShift account and you should be presented with a view similar to the image below (of course your name and domain will be different), all you need to do is click on your application (the arrow represents your application).
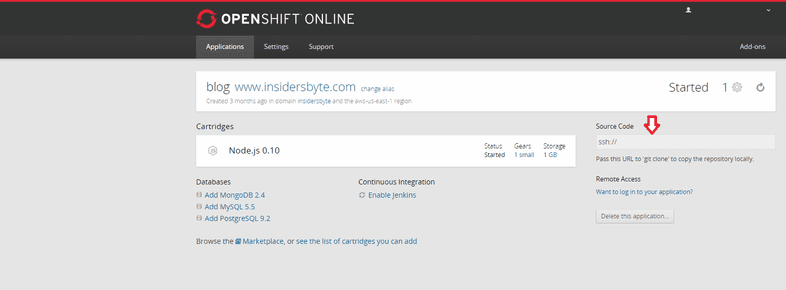
After clicking on the application you should be presented with a view similar to the image below. You need to copy the source code url as highlighted below (I have removed the full url from my link and only included the starting part, yours will contain the full link), this is your repository url that I mentioned above.
Now that you have your repository you have to open up command prompt and type in
git clone <repository_url> <directory to create>.
Where
<repository_url>is the url you copied from your OpenShift application.
Where
<directory to create>is the full path on your file system where you want your blog to be cloned to.
Congratulations Well done you have now cloned a local copy of your blog ready
for you to make changes.